Template: Button
This subsection will describe an OrbTk UI element called Button.
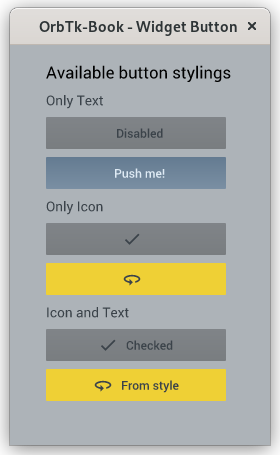
The complete source that demonstrates this template element is presented in Listing 3-1. After a successful compile run, it should produce the attached screen-shot:
We did compile for a desktop target (Linux). And if you did clone the book source to your development system, the corresponding source-code examples can be found inside the listings sub-directory. To compile it yourself, first change into this directory
src/listings/ch03-01-widget-button/listing-03-01
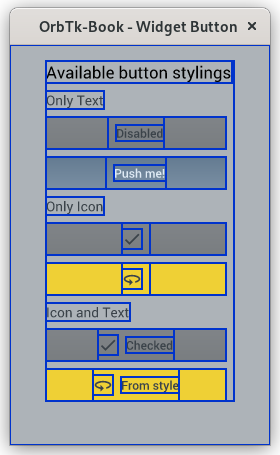
Next, use cargo to pipeline the compile and linking process. In the end the target binary will be executed. If you like to get a rendered output, that annotates the tree structure with respect to their bounds, please make use of the feature debug. This feature will draw blue boxes around any involved entities.
$ cargo run --features debug
Recap and annotation
The anatomy of this template
Let’s review the relevant parts of the widget_button application.
OrbTk code framing the app
As a first step, We put the needed OrbTk parts into scope.
use orbtk::{
    prelude::*,
    widgets::themes::theme_orbtk::{
        {colors, material_icons_font},
        theme_default_dark,
    },
};
Next we do declare "str" constants to any involved id’s. This isn’t
strictly necessary, but helps to identify the entities by meaningful names.
pub static ID_BUTTON_CONTAINER: &str = "ButtonContainer";
pub static ID_BUTTON_CHECK: &str = "ButtonCheck";
pub static ID_BUTTON_TEXT_BLOCK_HEADER: &str = "ButtonTextBlock Header";
pub static ID_BUTTON_TEXT_BLOCK_1: &str = "ButtonTextBlock 1";
pub static ID_BUTTON_TEXT_BLOCK_2: &str = "ButtonTextBlock 2";
pub static ID_BUTTON_TEXT_BLOCK_3: &str = "ButtonTextBlock 3";
pub static ID_BUTTON_ICONONLY: &str = "ButtonIcononly";
pub static ID_BUTTON_TEXTONLY: &str = "ButtonTextonly";
pub static ID_BUTTON_UNCHECK: &str = "ButtonUncheck";
pub static ID_BUTTON_STACK: &str = "ButtonStack";
pub static ID_BUTTON_STYLED: &str = "ButtonStyled";
pub static ID_BUTTON_VIEW: &str = "ButtonView";
pub static ID_WINDOW: &str = "button_Window";
The main function instantiates a new application, that makes use of the theme_default_dark and a re-sizable Window as its first children. For a deeper insight into this UI elements, please consult the relevant part in this book.
We will now focus our interest on the next part, where we do create a ButtonView as a child inside the Window entity.
                .child(
                    ButtonView::new()
                        .id(ID_BUTTON_VIEW)
                        .name(ID_BUTTON_VIEW)
                        .min_width(120.0)
                        .build(ctx),
                )
The syntax advises the compiler, to implement a ButtonView for the
Template trait. The widget!() macro relieves us to type out all
the boiler plate stuff and takes care to create the needed code sugar.
// Represents a button widgets.
widget!(ButtonView {});
We do use a Container widget as a first child inside the template method. It allows us, to place a padding around the included children. Please refer to its documentation section for a deeper dive.
            .child(
                Container::new()
                    .id(ID_BUTTON_CONTAINER)
                    .name(ID_BUTTON_CONTAINER)
                    .background(colors::BOMBAY_COLOR)
                    .border_brush(colors::BOMBAY_COLOR)
                    .border_width(2)
                    // padding definition:
                    // as touple clockwise (left, top, right, bottom)
                    .padding((36, 16, 36, 16))
                    .min_width(140.0)
The container will have a Stack child, that we do consume to attach multiple children in a horizontal direction. TextBlocks are used to render some header text above the Button children. This is the part of the code, that we are finally interested in.
OrbTk widget specific: Button
We are going to consume a button widget.
As any other template inside the widget tree of OrbTk, the template
is rendered with a preset of sane property values. If you choose not to
explicitly declare any property values inside the view code, the
defaults coded in the template definition will be evaluated.
The following Class-Diagram presents the button internal widget tree, including its default property values:
classDiagram

Button --o MouseBehavior

MouseBehavior --o Container

Container --o Stack

Stack --o FontIconBlock
Stack --o TextBlock

Button : name["button"]
Button : style["button"]
Button : height[36.0]
Button : min_width[64.0]
Button : background[colors-LYNCH_COLOR]
Button : border_radius[4.0]
Button : border_width[0.0]
Button : border_brush["transparent"]
Button : padding['16.0, 0.0, 16.0, 0.0']
Button : foreground[colors-LINK_WATER_COLOR]
Button : text[]
Button : font_size[orbtk_fonts-FONT_SIZE_12]
Button : font["Roboto-Regular"]
Button : icon[]
Button : icon_font["MaterialIcons-Regular"]
Button : icon_size[orbtk_fonts-ICON_FONT_SIZE_12]
Button : icon_brush[colors-LINK_WATER_COLOR]
Button : pressed[false]
Button : spacing[8.0]
Button : container_margin[0]

MouseBehavior : pressed(id)
MouseBehavior : enabled(id)
MouseBehavior : target(id.0)

Container : background(id)
Container : border_radius(id)
Container : border_width(id)
Container : border_brush(id)
Container : padding(id)
Container : opacity(id)
Container : margin("container_margin", id)

Stack : orientation(horizontal)
Stack : spacing(id)
Stack : h_align(center)

FontIconBlock : icon(id)
FontIconBlock : icon_brush(id)
FontIconBlock : icon_font(id)
FontIconBlock : icon_size(id)
FontIconBlock : v_align("center")

TextBlock : font(id)
TextBlock : font_size(id)
TextBlock : foreground(id)
TextBlock : opacity(id)
TextBlock : text(id)
TextBlock : v_align("center")
Workflow 3-1: Button tree
The first button child hasn’t choosen an icon. Thus the rendered output will just present the text property.
                            .child(
                                Button::new()
                                    .id(ID_BUTTON_TEXTONLY)
                                    .name(ID_BUTTON_TEXTONLY)
                                    .enabled(false)
                                    .max_width(180.0)
                                    .min_width(90.0)
                                    .text("Disabled")
                                    .build(ctx),
                            )
The button hasn’t declared a “text” property. Thus the rendered output will just present the icon content.
                            .child(
                                Button::new()
                                    .id(ID_BUTTON_CHECK)
                                    .name(ID_BUTTON_CHECK)
                                    .enabled(false)
                                    .icon(material_icons_font::MD_CHECK)
                                    .max_width(180.0)
                                    .min_width(90.0)
                                    .on_enter(|_, _| {
                                        println!("Enter Button boundries");
                                    })
                                    .on_leave(|_, _| {
                                        println!("Leave Button boundries");
                                    })
                                    .build(ctx),
                            )
Using a style method. Properties assingned via a theme definition take precedence over property definitons inside the view code.
                            .child(
                                Button::new()
                                    .id(ID_BUTTON_STYLED)
                                    .name(ID_BUTTON_STYLED)
                                    .style("button_primary")
                                    .icon(material_icons_font::MD_360)
                                    .max_width(180.0)
                                    .min_width(90.0)
                                    .pressed(true)
                                    .text("From style")
                                    .build(ctx),
                            )
                            .build(ctx),
Complete example source
Find attached the complete source code for our orbtk_widget_button example.
//!
//! OrbTk-Book: Annotated widget listing
//!

use orbtk::{
    prelude::*,
    widgets::themes::theme_orbtk::{
        {colors, material_icons_font},
        theme_default_dark,
    },
};

pub static ID_BUTTON_CONTAINER: &str = "ButtonContainer";
pub static ID_BUTTON_CHECK: &str = "ButtonCheck";
pub static ID_BUTTON_TEXT_BLOCK_HEADER: &str = "ButtonTextBlock Header";
pub static ID_BUTTON_TEXT_BLOCK_1: &str = "ButtonTextBlock 1";
pub static ID_BUTTON_TEXT_BLOCK_2: &str = "ButtonTextBlock 2";
pub static ID_BUTTON_TEXT_BLOCK_3: &str = "ButtonTextBlock 3";
pub static ID_BUTTON_ICONONLY: &str = "ButtonIcononly";
pub static ID_BUTTON_TEXTONLY: &str = "ButtonTextonly";
pub static ID_BUTTON_UNCHECK: &str = "ButtonUncheck";
pub static ID_BUTTON_STACK: &str = "ButtonStack";
pub static ID_BUTTON_STYLED: &str = "ButtonStyled";
pub static ID_BUTTON_VIEW: &str = "ButtonView";
pub static ID_WINDOW: &str = "button_Window";

fn main() {
    // Asure correct initialization, if compiling as a web application
    orbtk::initialize();

    Application::new()
        .theme(
            theme_default_dark()
        )
        .window(|ctx| {
            Window::new()
                .id(ID_WINDOW)
                .name(ID_WINDOW)
                .title("OrbTk-Book - Widget Button")
                .position((100.0, 100.0))
                .size(260.0, 400.0)
                .resizable(true)
                .child(
                    ButtonView::new()
                        .id(ID_BUTTON_VIEW)
                        .name(ID_BUTTON_VIEW)
                        .min_width(120.0)
                        .build(ctx),
                )
                .build(ctx)
        })
        .run()
}

// Represents a button widgets.
widget!(ButtonView {});

impl Template for ButtonView {
    fn template(self, _id: Entity, ctx: &mut BuildContext) -> Self {
        self.id(ID_BUTTON_VIEW)
            .name(ID_BUTTON_VIEW)
            .child(
                Container::new()
                    .id(ID_BUTTON_CONTAINER)
                    .name(ID_BUTTON_CONTAINER)
                    .background(colors::BOMBAY_COLOR)
                    .border_brush(colors::BOMBAY_COLOR)
                    .border_width(2)
                    // padding definition:
                    // as touple clockwise (left, top, right, bottom)
                    .padding((36, 16, 36, 16))
                    .min_width(140.0)
                    .child(
                        Stack::new()
                            .id(ID_BUTTON_STACK)
                            .name(ID_BUTTON_STACK)
                            .spacing(8)
                            .child(
                                TextBlock::new()
                                    .id(ID_BUTTON_TEXT_BLOCK_HEADER)
                                    .name(ID_BUTTON_TEXT_BLOCK_HEADER)
                                    .font_size(18)
                                    // generic color names:
                                    // constants from crate `utils` -> colors.txt
                                    .foreground("black")
                                    .text("Available button stylings")
                                    .build(ctx),
                            )
                            .child(
                                TextBlock::new()
                                    .id(ID_BUTTON_TEXT_BLOCK_1)
                                    .name(ID_BUTTON_TEXT_BLOCK_1)
                                    .font_size(14)
                                    // generic color name : rgb value
                                    .foreground("#3b434a")
                                    .text("Only Text")
                                    .build(ctx),
                            )
                            .child(
                                Button::new()
                                    .id(ID_BUTTON_TEXTONLY)
                                    .name(ID_BUTTON_TEXTONLY)
                                    .enabled(false)
                                    .max_width(180.0)
                                    .min_width(90.0)
                                    .text("Disabled")
                                    .build(ctx),
                            )
                            .child(
                                Button::new()
                                    .id(ID_BUTTON_CHECK)
                                    .name(ID_BUTTON_CHECK)
                                    .text("Push me!")
                                    .max_width(180.0)
                                    .min_width(90.0)
                                    .build(ctx),
                            )
                            .child(
                                TextBlock::new()
                                    .id(ID_BUTTON_TEXT_BLOCK_2)
                                    .name(ID_BUTTON_TEXT_BLOCK_2)
                                    .font_size(14)
                                    // theme color names:
                                    // constants from crate `orbtk_widgets`
                                    //  -> src/themes/themes_<theme_name>/colors.rs
                                    .foreground(colors::BRIGHT_GRAY_COLOR)
                                    //.foreground("#3b434a")
                                    .text("Only Icon")
                                    .build(ctx),
                            )
                            .child(
                                Button::new()
                                    .id(ID_BUTTON_CHECK)
                                    .name(ID_BUTTON_CHECK)
                                    .enabled(false)
                                    .icon(material_icons_font::MD_CHECK)
                                    .max_width(180.0)
                                    .min_width(90.0)
                                    .on_enter(|_, _| {
                                        println!("Enter Button boundries");
                                    })
                                    .on_leave(|_, _| {
                                        println!("Leave Button boundries");
                                    })
                                    .build(ctx),
                            )
                            .child(
                                Button::new()
                                    .id(ID_BUTTON_ICONONLY)
                                    .name(ID_BUTTON_ICONONLY)
                                    .style("button_primary")
                                    .icon(material_icons_font::MD_360)
                                    .max_width(180.0)
                                    .min_width(90.0)
                                    .pressed(true)
                                    .build(ctx),
                            )
                            .child(
                                TextBlock::new()
                                    .id(ID_BUTTON_TEXT_BLOCK_3)
                                    .name(ID_BUTTON_TEXT_BLOCK_3)
                                    .font_size(14)
                                    // theme color names:
                                    // constants from crate `orbtk_widgets`
                                    //  -> src/themes/themes_<theme_name>/colors.rs
                                    .foreground(colors::BRIGHT_GRAY_COLOR)
                                    .text("Icon and Text")
                                    .build(ctx),
                            )
                            .child(
                                Button::new()
                                    .id(ID_BUTTON_CHECK)
                                    .name(ID_BUTTON_CHECK)
                                    .enabled(false)
                                    .icon(material_icons_font::MD_CHECK)
                                    .max_width(180.0)
                                    .min_width(90.0)
                                    .text("Checked")
                                    .on_enter(|_, _| {
                                        println!("Enter Button boundries");
                                    })
                                    .on_leave(|_, _| {
                                        println!("Leave Button boundries");
                                    })
                                    .build(ctx),
                            )
                            .child(
                                Button::new()
                                    .id(ID_BUTTON_STYLED)
                                    .name(ID_BUTTON_STYLED)
                                    .style("button_primary")
                                    .icon(material_icons_font::MD_360)
                                    .max_width(180.0)
                                    .min_width(90.0)
                                    .pressed(true)
                                    .text("From style")
                                    .build(ctx),
                            )
                            .build(ctx),
                    )
                    .build(ctx),
            )
    }
}
Listing 3-2: orbtk_widget_button - Available button styles.
Compiling and Running Are Separate Steps
The cargo compiled orbtk_widget_button binary will be placed in the target subfolder of the project.
$ cargo build --release --bin orbtk_widget_button
$ ../target/release/orbtk_widget_button
On Windows, you need to use backslash as a path delimiter:
> cargo build --release --bin orbtk_widget_button
> ..\target\release\orbtk_widget_button.exe

